

Deploy Laravel project on cPanel easily with this step-by-step guide. In this tutorial, you will learn how to upload Laravel files, create a MySQL database, import SQL, update the .env file, configure index.php, and fix common Laravel deployment errors.
Deploying a Laravel project on cPanel can feel confusing at first, especially if you are moving your project from localhost to a live hosting server for the first time.
Unlike a normal HTML, PHP, or WordPress website, Laravel has a different folder structure. The main application files, environment file, vendor packages, routes, controllers, views, and public assets need to be placed correctly so that the website works properly and securely.
In this guide, we will show you how to upload and deploy a Laravel project on cPanel step by step. This tutorial is useful for students, developers, business owners, and anyone who wants to host a Laravel application on shared hosting or cPanel-based hosting.
What You Need Before Deploying Laravel on cPanel
Before starting the deployment process, make sure you have the following:
- A completed Laravel project
- cPanel login details
- A domain or subdomain connected to your hosting
- PHP version supported by your Laravel project
- MySQL database access
- Composer installed locally or available on the server
- A
.sqldatabase backup file if your project uses an existing database - Basic understanding of File Manager and phpMyAdmin in cPanel
If you need reliable hosting for Laravel websites, you can explore our cPanel hosting services at BISUP.
How to Deploy Laravel Project on cPanel
If your Laravel project is working properly on localhost, you can proceed with the deployment process.
Step 1: Prepare Your Laravel Project Locally
Before uploading the project to cPanel, open your Laravel project folder on your computer.
For example, your project folder may look like this:
ecommerce-project/
├── app/
├── bootstrap/
├── config/
├── database/
├── public/
├── resources/
├── routes/
├── storage/
├── vendor/
├── .env
├── artisan
├── composer.json
└── package.json
Now open Command Prompt, Terminal, or VS Code terminal inside your Laravel project directory.
Run the following commands:
composer install --optimize-autoloader --no-dev
This command installs the required PHP dependencies and optimizes Composer’s autoload files for production.
Next, run:
php artisan config:cache
This caches your Laravel configuration files and helps the application load faster in production.
Then run:
php artisan route:cache
This caches your application routes for better performance.
You can also run:
php artisan view:cache
This pre-compiles Blade view files and improves loading speed.
If your project uses Vite, Tailwind CSS, Vue, React, or any frontend build system, also run:
npm install
npm run build
This will generate the production-ready frontend assets inside the public/build folder.
Step 2: Check Your Laravel .env File
The .env file controls important settings such as app name, app URL, database name, database user, password, mail settings, and debug mode.
Before uploading your Laravel project, check the following values:
APP_NAME="Your Website Name"
APP_ENV=production
APP_DEBUG=false
APP_URL=https://yourdomain.com
For production websites, always keep:
APP_DEBUG=false
This is very important because if APP_DEBUG=true, Laravel may show sensitive error details to visitors.
You will update the database details after creating the database in cPanel.
Step 3: Zip Your Laravel Project
After preparing your project, compress it into a .zip file.
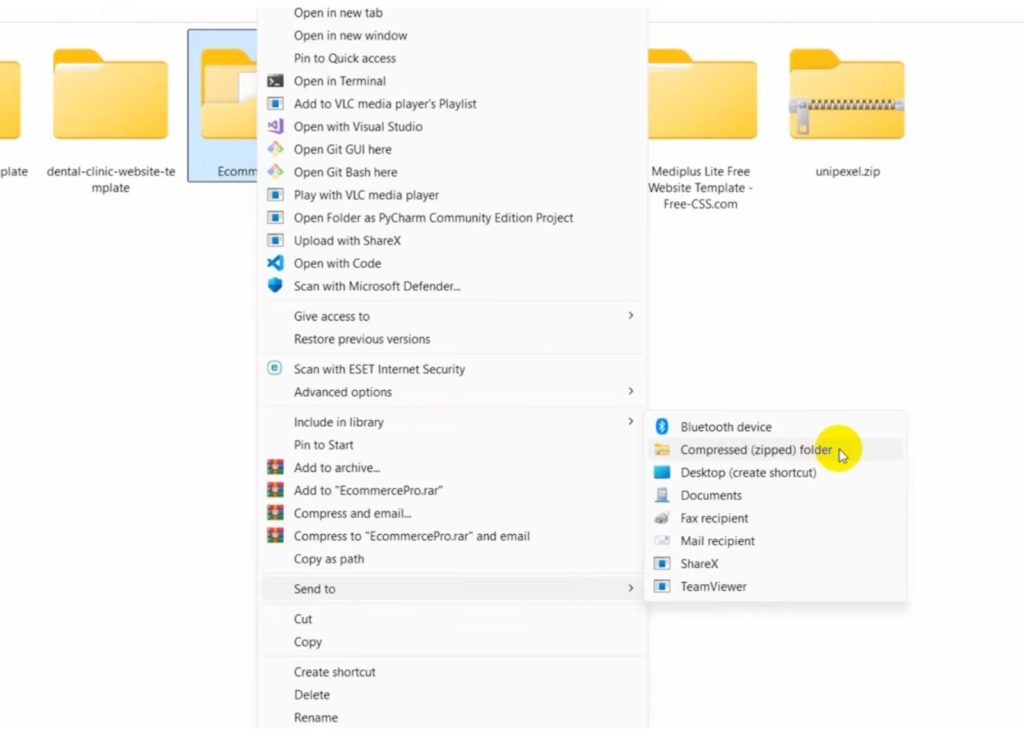
On Windows:
- Right-click your Laravel project folder.
- Click Show more options.
- Select Send to.
- Click Compressed zipped folder.
Your project will now be converted into a zip file.
Example:
ecommerce-project.zip
This zip file is what you will upload to cPanel.
Step 4: Log in to cPanel
Now log in to your cPanel account.
Usually, the cPanel URL looks like this:
https://yourdomain.com/cpanel
or
https://yourdomain.com:2083
After logging in, find and open File Manager.
Step 5: Upload Laravel Project to cPanel
Inside File Manager, go to your hosting account directory.
For a main domain, the website root is usually:
public_html
For better security, Laravel’s main application files should not be directly exposed inside public_html.
A better structure is:
/home/username/laravel-app
/home/username/public_html
Here:
laravel-appcontains your main Laravel project files.public_htmlcontains only the files from Laravel’spublicfolder.
This is safer because files like .env, routes, app, config, and vendor are not directly accessible from the browser.
Create a folder outside public_html, for example:
laravel-app
Upload your Laravel zip file into this folder and extract it.
After extracting, your Laravel files should be inside:
/home/username/laravel-app
Step 6: Move Laravel Public Files to public_html
Now open your extracted Laravel project folder and go inside the public folder.
You will see files such as:
index.php
.htaccess
favicon.ico
robots.txt
build/
assets/
Select all files and folders inside the public folder.
Copy them to:
public_html
Now your public_html folder should contain Laravel’s public files only.
Example:
public_html/
├── index.php
├── .htaccess
├── favicon.ico
├── robots.txt
├── build/
└── assets/
Step 7: Edit index.php
Now go to public_html and edit the index.php file.
By default, Laravel’s index.php may contain paths like this:
require __DIR__.'/../vendor/autoload.php';

$app = require_once __DIR__.'/../bootstrap/app.php';
Because your Laravel project files are now inside the laravel-app folder, update the paths like this:
require __DIR__.'/../laravel-app/vendor/autoload.php';

$app = require_once __DIR__.'/../laravel-app/bootstrap/app.php';
Save the file.
This tells cPanel to load the Laravel application from the correct folder while keeping only public files inside public_html.
Alternative Method: Uploading Laravel Directly Inside public_html
Some tutorials upload the full Laravel project directly into public_html and then copy the contents of the public folder into the root.
In that case, the index.php paths are changed from:
require __DIR__.'/../vendor/autoload.php';

$app = require_once __DIR__.'/../bootstrap/app.php';
to:
require __DIR__.'/vendor/autoload.php';

$app = require_once __DIR__.'/bootstrap/app.php';
This method can work, but it is not the safest method because your main Laravel files may be placed inside the public web directory.
For production websites, it is better to keep the main Laravel project outside public_html.
Step 8: Create a MySQL Database in cPanel
Now you need to create a database for your Laravel project.
Go back to cPanel and search for:
MySQL Databases
or
Manage My Databases
Click on it.
Create a new database.
Example:
username_ecommerce
In cPanel, the database name usually includes your cPanel username as a prefix.
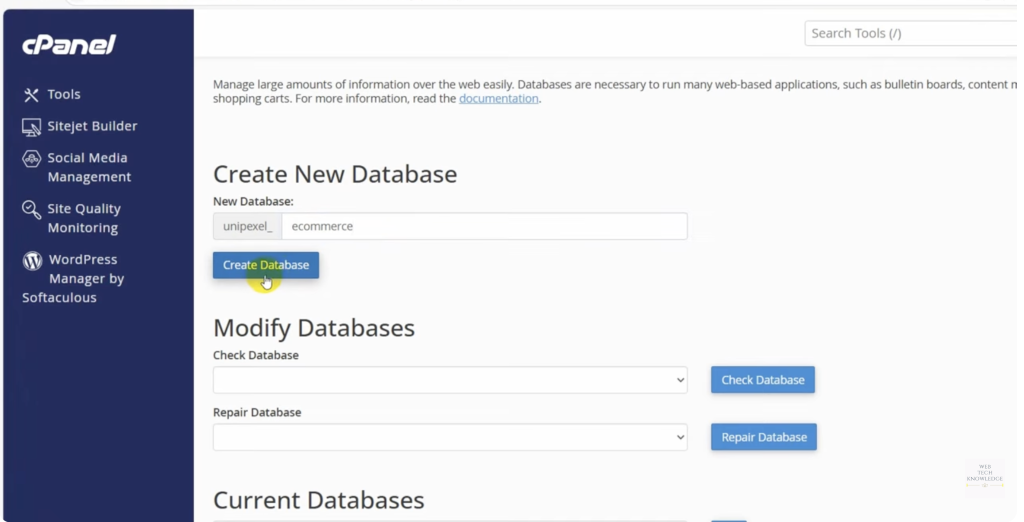
For example, if your cPanel username is bisup, and your database name is ecommerce, the full database name may become:
bisup_ecommerce
Copy the full database name and keep it somewhere safe.
Step 9: Create a Database User
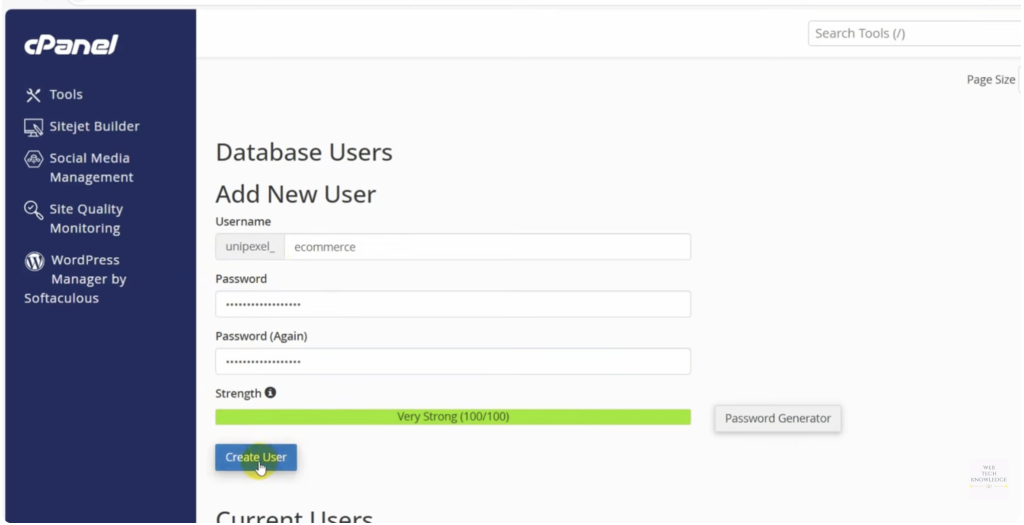
After creating the database, create a new database user.
Example:
bisup_ecommerce_user
Set a strong password for this user.
Avoid using weak passwords such as:
123456
password
admin123
Use a strong password with uppercase letters, lowercase letters, numbers, and special characters.
Example:
B!sup@2026#SecureDB
After creating the user, add the user to the database.
Then select:
All Privileges
Click Make Changes.
This allows your Laravel application to connect to the database and perform required operations.
Step 10: Import Your Database Using phpMyAdmin
If your Laravel project already has an existing database from localhost, you need to import the .sql file.
Go to cPanel and open:
phpMyAdmin
Select the database you created.
Click on the Import tab.
Choose your .sql file from your computer.
Then click Import.
If the import is successful, you will see your database tables inside phpMyAdmin.
Example tables may include:
users
products
orders
categories
migrations
password_reset_tokens
If you do not have an SQL file and your project uses Laravel migrations, you can run migrations using terminal:
php artisan migrate --force
However, this requires terminal or SSH access on your cPanel hosting.
Step 11: Update Database Details in .env
Now go back to your Laravel project folder in cPanel.
Open the .env file.
If you cannot see the .env file, click Settings in File Manager and enable:
Show Hidden Files
Now edit the .env file and update the database details:
DB_CONNECTION=mysql
DB_HOST=127.0.0.1
DB_PORT=3306
DB_DATABASE=your_database_name
DB_USERNAME=your_database_user
DB_PASSWORD=your_database_password
Example:
DB_CONNECTION=mysql
DB_HOST=127.0.0.1
DB_PORT=3306
DB_DATABASE=bisup_ecommerce
DB_USERNAME=bisup_ecommerce_user
DB_PASSWORD=B!sup@2026#SecureDB
Also update your website URL:
APP_URL=https://yourdomain.com
Save the file.
Step 12: Generate Application Key if Needed
Laravel requires an application key.
Check your .env file and make sure this value exists:
APP_KEY=
If it is empty, generate the key using terminal:
php artisan key:generate
If cPanel does not provide terminal access, you can generate the key locally and update it in the .env file before uploading the project.
A valid Laravel app key looks like this:
APP_KEY=base64:xxxxxxxxxxxxxxxxxxxxxxxxxxxxxxxxxxxxxxxxxxx
Step 13: Set Correct File and Folder Permissions
Laravel needs permission to write cache, logs, and session files.
Make sure these folders are writable:
storage
bootstrap/cache
Recommended permissions are usually:
Folders: 755
Files: 644
If the website shows permission errors, you may need to set write permission for:
storage
bootstrap/cache
Avoid setting full project permissions to 777 unless your hosting provider specifically tells you to do so. It is not recommended for security.
Step 14: Create Storage Link
If your Laravel project stores images or uploaded files using Laravel’s storage system, you need to create a storage link.
Run:
php artisan storage:link
This creates a public link from:
public/storage
to:
storage/app/public
If your hosting does not allow terminal access, you may need to create the symlink manually or ask your hosting provider to enable terminal access.
Step 15: Clear and Rebuild Laravel Cache
After updating .env, database settings, or app URL, clear old cache and rebuild it.
Run these commands:
php artisan config:clear
php artisan cache:clear
php artisan route:clear
php artisan view:clear
Then run production cache commands again:
php artisan config:cache
php artisan route:cache
php artisan view:cache
This helps Laravel load the latest configuration properly.
Step 16: Check Your Website
Now open your domain in the browser:
https://yourdomain.com
If everything is configured correctly, your Laravel project should load successfully.
If your website uses database content, check whether the products, categories, users, posts, or other dynamic data are showing properly.
Common Laravel cPanel Deployment Issues and Fixes
1. Website Shows File List Instead of Laravel Website
This usually happens when Laravel’s public files are not placed correctly inside public_html.
Make sure index.php and .htaccess from the Laravel public folder are inside public_html.
2. 500 Internal Server Error
A 500 error may happen because of:
- Wrong PHP version
- Incorrect file permissions
- Missing
.envfile - Missing vendor folder
- Incorrect
index.phppath - Incorrect database credentials
- Laravel cache issue
Check the Laravel log file:
storage/logs/laravel.log
This file usually shows the exact reason for the error.
3. Database Connection Error
If you see an error like:
SQLSTATE[HY000] [1045] Access denied for user
check your .env database details:
DB_DATABASE=
DB_USERNAME=
DB_PASSWORD=
Make sure the database user is assigned to the database with all privileges.
4. CSS and JavaScript Not Loading
If your website loads but CSS or JavaScript does not work, check:
APP_URLin.env- Whether
npm run buildwas executed - Whether the
public/buildfolder was uploaded - Whether asset paths are correct
- Whether
.htaccessexists insidepublic_html
5. Images Not Showing
If uploaded images are not showing, run:
php artisan storage:link
Also check whether your images exist inside:
storage/app/public
and whether the symbolic link exists in:
public/storage
6. .env File Not Visible
In cPanel File Manager, hidden files may not be visible by default.
Click Settings and enable:
Show Hidden Files
Then you should be able to see the .env file.
Laravel Deployment Checklist for cPanel
Before making your Laravel website live, check the following:
- Laravel project uploaded successfully
publicfolder files copied topublic_htmlindex.phppaths updated correctly.envfile configured properlyAPP_ENV=productionAPP_DEBUG=false- Database created in cPanel
- Database user created and assigned
- SQL file imported into phpMyAdmin
- Correct database details added in
.env vendorfolder exists- Frontend assets built using
npm run build - Storage link created if required
- File permissions checked
- SSL certificate installed
- Website tested on desktop and mobile
Best Practice: Do Not Expose Laravel Core Files Publicly
Laravel is designed in a way that only the public folder should be accessible from the browser.
Your important files such as:
.env
routes/
app/
config/
database/
vendor/
storage/
should not be publicly accessible.
That is why the recommended method is to keep the main Laravel project outside public_html and only place the contents of the public folder inside public_html.
This improves the security of your Laravel application.
Final Thoughts
Deploying a Laravel project on cPanel is not difficult once you understand the correct folder structure.
The most important part is this:
Your Laravel application files should stay outside the public directory, and only the contents of the public folder should be served through public_html.
After that, you only need to configure the database, update the .env file, import your SQL file, adjust the index.php path, and clear Laravel cache.
Once everything is configured properly, your Laravel application will run live on your domain.
If you are hosting a business website, eCommerce platform, school system, CRM, booking system, or custom Laravel application, proper deployment is important for performance, security, and reliability.
At BISUP, we help businesses deploy, manage, secure, and optimize Laravel applications on cPanel, VPS, and cloud hosting environments.


