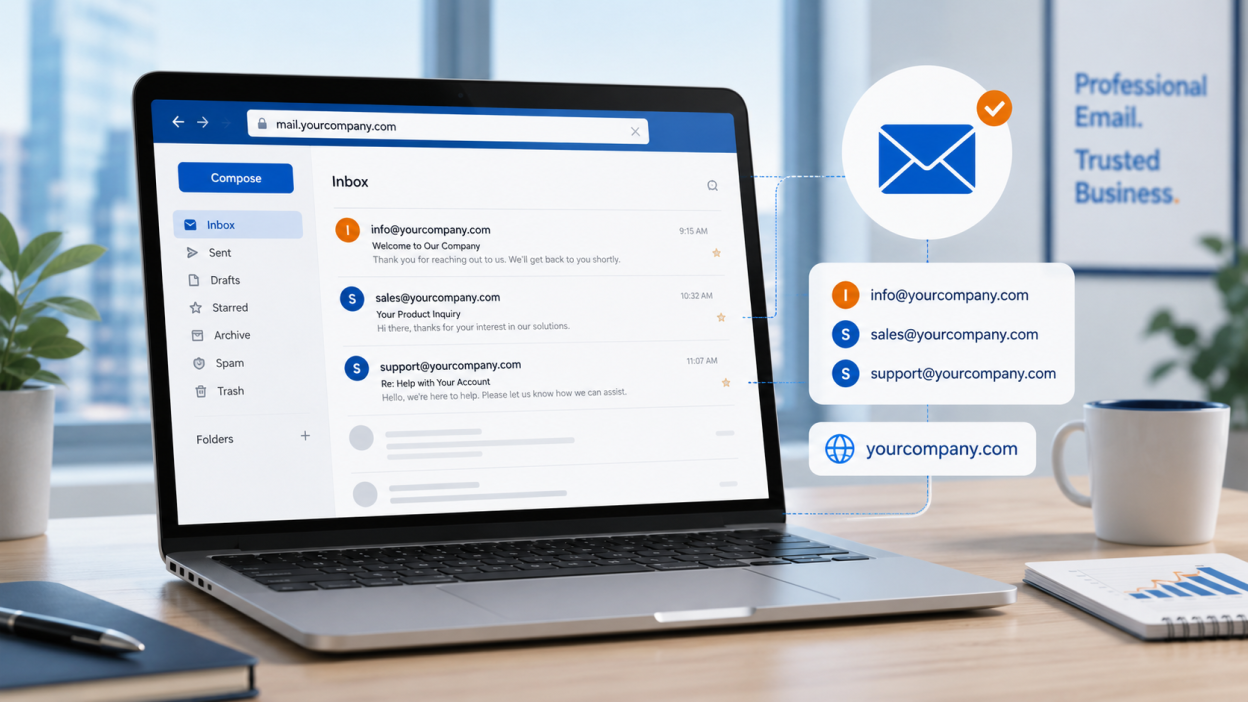
A professional business email is one of the simplest ways to make your brand look more trustworthy.
When a customer receives an email from yourname@gmail.com, it may work for personal communication. But when the email comes from info@yourcompany.com, sales@yourcompany.com, or support@yourcompany.com, it immediately looks more official, organized, and business-ready.
For any growing business, a domain-based email address is not just a technical setup. It is part of your brand identity.
If your business already has a domain name, you can use that domain to create professional email addresses for your team. In this guide, we will explain what business email is, why it matters, what DNS records are required, and how to set up professional business email with your own domain.
Why Your Business Needs a Domain-Based Email Address?
Many small businesses start with free email accounts because they are easy to create. However, as the business grows, using a free email address can look less professional.

A domain-based email is not vanity, it is infrastructure. It does three concrete jobs for your business.
1. It Builds Trust
Customers, suppliers and partners take an address at your own domain far more seriously than a free webmail account. It shows permanence and professionalism at the first point of contact.
For example, if your website is bisup.com, then an email like support@bisup.com looks more reliable than bisupsupport123@gmail.com.
A professional email shows that the business has a proper domain, website, and communication system.
2. It Improves Brand Identity
Owning the domain and its email means no one else can casually use your business name in an address. Combined with authentication, it stops criminals from spoofing your domain to scam your customers.
When your team uses domain-based emails, your company name appears in every conversation. This helps people remember your brand.
For example:
sales@yourcompany.comaccounts@yourcompany.comhr@yourcompany.com
These addresses look organized and help customers understand which department they are contacting.
3. It Looks More Professional
Free email accounts belong to the provider. A domain email belongs to your company, so staff addresses, records and reputation stay under your control even as people come and go.
A business email creates a better first impression and makes your company look more established.
This is especially important for:
- IT companies
- Hosting providers
- Consultancies
- Schools and colleges
- eCommerce stores
- Agencies
- Hotels
- Clinics
- Construction companies
- Service-based businesses
4. It Gives Better Control
With business email, you can create and manage multiple accounts for your team.
For example:
info@yourcompany.comsales@yourcompany.comsupport@yourcompany.combilling@yourcompany.comadmin@yourcompany.com
If an employee leaves the company, you can disable or transfer their mailbox. This is much safer than using personal email accounts for business communication.
5. It Helps With Email Security
A properly configured business email uses DNS records such as SPF, DKIM, and DMARC.
These records help verify that emails sent from your domain are legitimate. They also help reduce email spoofing, phishing, and spam-related issues.
Without these records, attackers may try to send fake emails using your domain name.
How to Set Up Business Email With Your Domain: Step by Step
Before creating a professional business email, you need a few basic things.
Step 1: Register Your Domain
Everything starts with the domain, because your email address is built on it. If you already own your website domain, you can use it for email too. If not, register one that matches your business name. Keep it short and memorable, and pick the extension that fits your market, whether that is a .com or a country domain. You can register a domain and set up matching email in the same place, which keeps management simple.
Step 2: Choose an Email Hosting Provider
Next, decide where your mailboxes live. You have three broad options, and the right one depends on your size and budget.
| Option | Best for | Trade-off |
| Email hosting with your web host | Most small businesses and startups | Simple, affordable, mail and site in one place |
| Dedicated suite (Google Workspace, Microsoft 365) | Teams needing full document and collaboration tools | Higher monthly cost per user |
| Self-managed mail server | Advanced technical teams only | Powerful but heavy to maintain and secure |
For most businesses, email hosting bundled with your web hosting is the practical choice. It is cost-effective, it keeps your domain, website and email under one login, and a good host configures much of the hard part for you.
Step 3: Create Your Mailboxes
Once your provider is set, create your addresses. Plan them before you click. A clean structure looks professional and scales as you grow.
- Personal addresses for individuals, such as firstname@yourbusiness.com.
- Role addresses for functions, such as info@, sales@, or support@yourbusiness.com. These outlive any single employee.
- Aliases that forward to a real mailbox, useful when one person handles several roles.
Step 4: Add Your MX Records
This is the step that actually routes mail to your new mailboxes. MX (Mail Exchange) records tell the internet which server handles email for your domain. Your provider gives you one or more MX records to add in your domain’s DNS settings. Enter them exactly as shown, including the priority numbers. Once they propagate, usually within a few hours, mail sent to your domain arrives in your new inbox.
| Watch out If your domain uses Cloudflare or a similar proxy, keep your MX records and mail subdomains set to DNS Only, never proxied. Email must not route through a CDN proxy. See our Cloudflare setup guide for the exact setting. |
The Part Everyone Skips: Email Authentication in 2026
Here is where most guides stop and most businesses get burned. Creating a mailbox does not guarantee your email is delivered. Since 2024, Google and Yahoo have required proper authentication, Microsoft joined in 2025, and by 2026 enforcement is strict. Unauthenticated email is now treated as a security threat and is rejected or sent to spam. Three DNS records fix this: SPF, DKIM and DMARC. Think of them as the identity documents your email carries.
SPF: Who Is Allowed to Send
SPF (Sender Policy Framework) is a DNS record listing the servers authorized to send email for your domain. When a receiving server gets your message, it checks whether the sending server is on that list. If it is not, the mail looks forged. One common trap: SPF allows only 10 DNS lookups. If you use several third-party tools like a newsletter service and a helpdesk, you can exceed that limit, SPF fails, and delivery collapses. Keep your record lean and audit it.
DKIM: Proof the Message Was Not Tampered With
DKIM (DomainKeys Identified Mail) adds a cryptographic signature to every message you send. The receiving server checks that signature against a public key in your DNS, which proves two things: the mail genuinely came from your domain, and nobody altered it in transit. DKIM survives email forwarding better than SPF, which makes it essential. Use a key of at least 1024 bits, and 2048 bits if your provider supports it.
DMARC: The Rule That Ties It Together
DMARC (Domain-based Message Authentication, Reporting and Conformance) tells receiving servers what to do when a message fails SPF or DKIM, and it checks that the visible From address aligns with your authenticated domain. It has three policy levels. Start at p=none to monitor without blocking, review the reports to confirm your legitimate mail passes, then move to p=quarantine and eventually p=reject for full protection against spoofing. In 2026, lingering on p=none for years is viewed with suspicion, so treat it as a starting line, not a destination.
| Watch out Keep your spam complaint rate below 0.3 percent, the hard ceiling Gmail and Yahoo enforce. Google recommends staying under 0.1 percent for reliable inbox placement. A sender delivering 10,000 emails needs only 30 spam reports to cross the line, so send only to people who expect your mail. |
Choosing the Right Business Email Provider
The email provider you choose affects reliability, storage, security, deliverability, and cost.
Here are the most common options.
Google Workspace
Google Workspace is one of the most popular options for professional business email. It allows businesses to use Gmail with their own domain name.
For example:
info@yourcompany.com
You get a Gmail-style interface with business email, cloud storage, calendar, Google Meet, Docs, Sheets, and other productivity tools.
Google Workspace is suitable for businesses that want a clean interface, strong reliability, and easy collaboration.
Best for:
- Startups
- Agencies
- Consultancies
- Remote teams
- Small and medium businesses
- Teams already using Google tools
Microsoft 365
Microsoft 365 is another strong option for business email. It uses Outlook and Exchange Online for email hosting.
It also includes tools like Word, Excel, PowerPoint, Teams, OneDrive, and SharePoint depending on the plan.
Microsoft 365 is suitable for businesses that already use Microsoft Office tools or need enterprise-level email and collaboration.
Best for:
- Corporate teams
- Enterprises
- Schools
- Finance and accounting teams
- Businesses using Outlook and Microsoft Office
Zoho Mail
Zoho Mail is a budget-friendly business email option. It provides domain-based email hosting with a clean interface and useful business features.
It is often a good choice for small businesses that need professional email at a lower cost.
Best for:
- Small businesses
- Startups
- Local companies
- Budget-conscious businesses
- Teams needing simple business email
cPanel or DirectAdmin Email
Many web hosting plans include email hosting through cPanel or DirectAdmin.
This allows you to create emails like:
info@yourcompany.com
directly from your hosting control panel.
This option can be affordable because email is included with your hosting plan. However, deliverability, storage, spam filtering, and reliability may depend heavily on the quality of the hosting provider and server configuration.
Best for:
- Basic business websites
- Small companies
- Low-budget email setup
- Businesses that do not need advanced collaboration tools
Dedicated or Managed Mail Server
Some businesses use a dedicated mail server or managed email infrastructure.
This gives more control but also requires technical management, monitoring, IP reputation handling, spam protection, backups, security, and proper DNS configuration.
Best for:
- Hosting providers
- Larger organizations
- Businesses with special email requirements
- Companies needing full control over mail infrastructure
For most small and medium businesses, Google Workspace, Microsoft 365, Zoho Mail, or managed hosting email is usually easier and safer.
Important DNS Records for Business Email
Professional email depends heavily on DNS records.
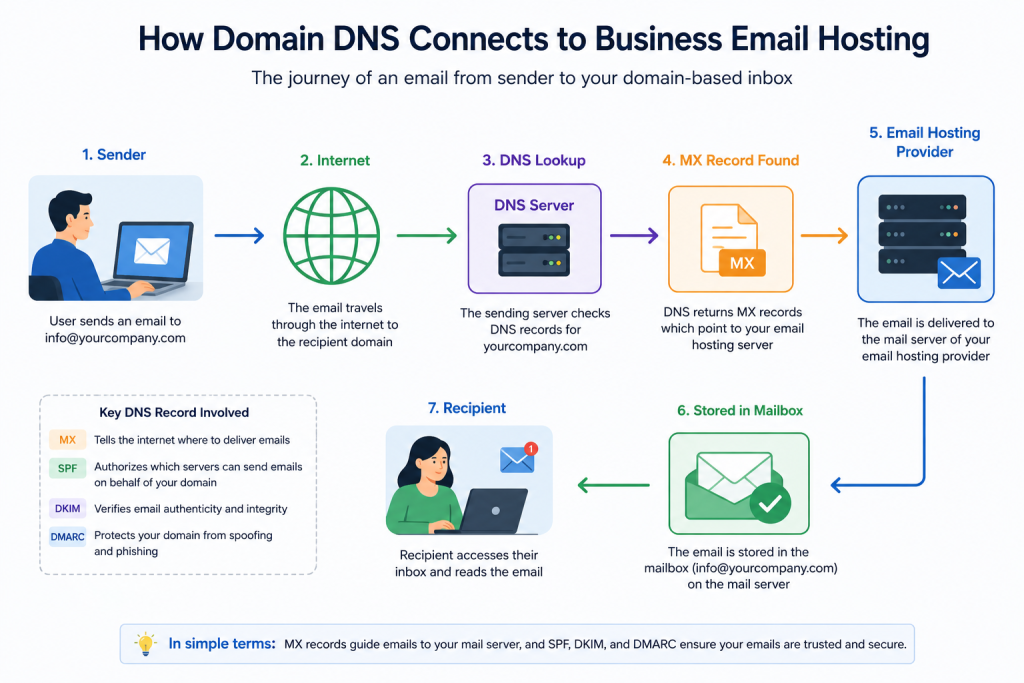
If DNS records are wrong, your email may not work properly. You may face issues such as:
- Emails not being received
- Emails going to spam
- Authentication failures
- Domain verification failure
- Spoofing risk
- Mail delivery delay
- Bounce-back messages
The most important email DNS records are:
- MX
- SPF
- DKIM
- DMARC
- CNAME
- TXT
Let’s understand each one.

MX Record
MX stands for Mail Exchange.
MX records tell the internet which mail server should receive emails for your domain.
For example, if someone sends an email to:
info@yourcompany.com
the sender’s mail server checks the MX record of yourcompany.com to know where to deliver the message.
If you use Google Workspace, Google provides MX records.
If you use Microsoft 365, Microsoft provides MX records.
If you use Zoho Mail, Zoho provides MX records.
If you use cPanel email, your hosting provider provides MX records.
Without correct MX records, your domain may not receive email.
SPF Record
SPF stands for Sender Policy Framework.
It tells receiving mail servers which servers are allowed to send email on behalf of your domain.
For example, if your domain uses Google Workspace, your SPF record should authorize Google to send mail for your domain.
If your SPF record is missing or incorrect, your emails may look suspicious to receiving mail servers.
An SPF record is usually added as a TXT record in DNS.
Example format:
v=spf1 include:example-provider.com ~all
The exact value depends on your email provider.
Important note: a domain should usually have only one SPF record. If you need to authorize multiple services, they should normally be combined into one SPF record instead of creating multiple separate SPF records.
DKIM Record
DKIM stands for DomainKeys Identified Mail.
It adds a digital signature to outgoing emails. This signature helps receiving mail servers verify that the email was really sent by an authorized system and was not changed during delivery.
DKIM is usually added as a TXT or CNAME record, depending on the provider.
For example, your provider may give you a record like:
selector1._domainkey.yourcompany.com
with a specific value that must be added to DNS.
After adding the DKIM record, you usually need to return to your email provider’s dashboard and enable or verify DKIM.
DKIM is very important for email deliverability and domain reputation.
DMARC Record
DMARC stands for Domain-based Message Authentication, Reporting, and Conformance.
DMARC works with SPF and DKIM. It tells receiving mail servers what to do when an email fails authentication.
A DMARC policy can be set to:
nonequarantinereject
DMARC Policy: none
This is usually used for monitoring. Emails are not blocked, but reports can be collected.
DMARC Policy: quarantine
Suspicious emails may be sent to spam or junk.
DMARC Policy: reject
Suspicious emails may be rejected completely.
A basic DMARC record may look like this:
v=DMARC1; p=none; rua=mailto:dmarc@yourcompany.com
For new setups, many businesses start with p=none to monitor email activity first. After confirming SPF and DKIM are working properly, they can gradually move to quarantine or reject.
CNAME Records
Some email providers use CNAME records for verification, DKIM, autodiscover, or service routing.
For example, Microsoft 365 may use CNAME records for autodiscover and DKIM. Google and Zoho may also provide provider-specific verification or authentication records.
Always copy the values exactly as provided by your email provider.
TXT Records
TXT records are used for many email-related purposes, including:
- Domain verification
- SPF
- DKIM
- DMARC
- Ownership checks
- Security records
When setting up business email, you will often add multiple TXT records.
Make sure you do not overwrite existing records unless you are sure they are no longer needed.
Step-by-Step Guide to Set Up Professional Business Email
Now let’s go through the complete setup process.
Step 1: Register or Confirm Your Domain Name
First, make sure you have a domain name.
For example:
yourcompany.com
If you already have a website, you probably already have a domain.
If you do not have a domain yet, register one from a trusted domain registrar. Choose a domain that is short, easy to remember, and matches your business name.
Avoid confusing spellings or unnecessary hyphens if possible.
Step 2: Choose an Email Hosting Provider
Next, choose where your email will be hosted.
You can choose:
- Google Workspace
- Microsoft 365
- Zoho Mail
- cPanel email
- DirectAdmin email
- Managed email hosting
When choosing a provider, consider:
- Monthly cost
- Storage per user
- Spam filtering
- Security features
- Ease of use
- Mobile app support
- Webmail interface
- Backup options
- Collaboration tools
- Support quality
For a small business, Zoho Mail or hosting email may be cost-effective.
For a professional team, Google Workspace or Microsoft 365 may be better.
For businesses needing hands-on support, a managed provider like BISUP can help configure and maintain the setup.
Step 3: Create Email Accounts
After choosing a provider, create the required mailboxes.
Start with important addresses such as:
info@yourcompany.comsales@yourcompany.comsupport@yourcompany.combilling@yourcompany.com
You can also create personal staff emails:
name@yourcompany.com
For very small businesses, you may start with only one or two accounts.
For example:
info@yourcompany.comyourname@yourcompany.com
You can add more later as the business grows.
Step 4: Verify Domain Ownership
Most email providers require you to verify that you own the domain.
They usually give you a TXT or CNAME record to add in your DNS.
For example, the provider may ask you to add a TXT record like:
google-site-verification=example-code
or a CNAME record with a unique verification value.
After adding the record, you click “Verify” in the email provider dashboard.
Domain verification proves that you control the domain and are allowed to create email addresses for it.
Step 5: Add MX Records
After domain verification, you need to add MX records.
MX records tell the internet where to deliver emails for your domain.
Your provider will give you exact MX values.
For example, the MX records may include:
- Server name
- Priority value
- TTL value
You must add them exactly as provided.
Important: if you are switching from an old email provider to a new one, changing MX records will affect where new emails are delivered. Before changing MX records, make sure the new mailboxes are created and ready.
Step 6: Add SPF Record
Next, add the SPF record.
SPF helps receiving servers verify which services are allowed to send email from your domain.
Your email provider will give you the correct SPF value.
For example:
v=spf1 include:provider.com ~all
If you send emails from multiple services, such as your email provider, website contact form, CRM, billing system, or newsletter platform, all authorized senders should be included properly.
Avoid creating multiple SPF records. Multiple SPF records can cause authentication issues.
Step 7: Add DKIM Record
After SPF, configure DKIM.
Your provider will generate DKIM records for your domain.
These records may be TXT or CNAME records. Add them in DNS exactly as provided.
After DNS is updated, go back to your email provider dashboard and enable or verify DKIM.
DKIM is important because it helps prove that your outgoing emails are legitimate and have not been modified during delivery.
Step 8: Add DMARC Record
After SPF and DKIM are working, add a DMARC record.
A simple starting DMARC record can be:
v=DMARC1; p=none; rua=mailto:dmarc@yourcompany.com
This allows you to monitor email authentication reports without blocking emails immediately.
Later, after checking that legitimate emails are passing SPF and DKIM, you can move to stricter policies such as:
p=quarantine
or:
p=reject
For businesses, DMARC is important because it helps protect the domain from spoofing and phishing attempts.
Step 9: Configure Email Clients
After DNS is ready, configure email access.
Depending on your provider, you may use:
- Webmail
- Gmail interface
- Outlook app
- Apple Mail
- Thunderbird
- Mobile mail app
- IMAP/SMTP settings
For Google Workspace, users usually access email through Gmail.
For Microsoft 365, users usually access email through Outlook.
For cPanel or DirectAdmin email, users may use webmail or configure IMAP/SMTP manually.
Make sure users have:
- Email address
- Password
- Login URL
- IMAP server
- SMTP server
- Port numbers
- SSL/TLS settings
For security, enable two-factor authentication if your provider supports it.
Step 10: Test Sending and Receiving
After setup, test the email properly.
Send test emails:
- From your business email to Gmail
- From Gmail to your business email
- From your business email to Outlook
- From Outlook to your business email
- From website contact form to your business email
Check:
- Email delivery
- Spam folder
- Reply function
- Attachments
- Signature
- Mobile access
- Webmail access
- Contact form delivery
Do not assume the setup is complete just because the mailbox opens. Always test real sending and receiving.
Step 11: Check Email Authentication
After sending test emails, check whether SPF, DKIM, and DMARC are passing.
You can use email testing tools to verify:
- SPF pass
- DKIM pass
- DMARC pass
- Reverse DNS
- Blacklist status
- Spam score
- Mail server reputation
If authentication fails, review your DNS records carefully.
Common issues include:
- Wrong SPF value
- Multiple SPF records
- Missing DKIM record
- DKIM not enabled in provider dashboard
- DMARC syntax error
- DNS propagation delay
- Wrong MX priority
- Old email records still present
Setting Up Business Email in Cloudflare DNS
Many businesses use Cloudflare to manage DNS. If your domain uses Cloudflare nameservers, email records must be added inside Cloudflare.

In Cloudflare, go to:
Domain → DNS → Records
Then add the records provided by your email provider.
Common records include:
- MX record for receiving email
- TXT record for SPF
- TXT or CNAME record for DKIM
- TXT record for DMARC
- CNAME records for provider-specific services
Important: website records may be proxied through Cloudflare, but mail-related records should usually remain DNS Only.
For example:
| Record | Proxy Status |
|---|---|
yourcompany.com website A record | Proxied or DNS Only |
www website CNAME | Proxied or DNS Only |
mail.yourcompany.com | DNS Only |
| MX record | DNS Only |
| SPF TXT record | DNS Only |
| DKIM TXT/CNAME record | DNS Only |
| DMARC TXT record | DNS Only |
If mail-related records are incorrectly proxied, email services may not work properly.
Business Email Setup for Website Contact Forms
Many businesses set up professional email but forget about website contact forms.
Your website may send email from:
- Contact form
- Order form
- Booking form
- Registration form
- Password reset form
- WooCommerce order notification
- Laravel notification
- WordPress plugin
- WHMCS billing system
If your website sends email using PHP mail without authentication, messages may go to spam.
A better approach is to configure SMTP.
SMTP allows your website to send emails through an authenticated mail server.
For example, your WordPress website can send form submissions using:
smtp.yourcompany.com
or your provider’s SMTP server.
This improves delivery and reduces spam issues.
Business Email Migration: Moving from Old Email to New Email
If your business already uses email and you are switching providers, plan the migration carefully.
A poor migration can cause:
- Lost emails
- Missed customer messages
- Duplicate mailboxes
- Downtime
- Confusion for staff
- Emails going to old provider
- Authentication issues
Before migration:
- Create all new mailboxes
- Back up old email data
- Note existing DNS records
- Check current MX records
- Prepare new DNS records
- Inform users
- Set up email clients
- Test new mailboxes
- Migrate old emails if needed
When ready, update MX records to point to the new provider.
After migration:
- Test sending and receiving
- Check spam folder
- Verify SPF, DKIM, and DMARC
- Update website SMTP settings
- Update email signatures
- Monitor delivery for a few days
Business email migration should be handled carefully, especially for companies that depend on email communication every day.
Common Business Email Setup Mistakes
Email setup looks simple, but small mistakes can create serious problems.
Here are the most common issues.
1. Wrong MX Record
If MX records are wrong, your domain may not receive emails.
Always use the exact MX records provided by your email provider.
2. Missing SPF Record
Without SPF, receiving servers may not know which systems are allowed to send email from your domain.
This can affect deliverability.
3. Multiple SPF Records
A domain should not have multiple separate SPF records.
If you use more than one sending service, combine them properly into one SPF record.
4. DKIM Record Added but Not Enabled
Some providers require you to add the DKIM DNS record and then click an enable or verify button in the dashboard.
If you only add the record but do not enable DKIM, it may not work.
5. No DMARC Record
Many businesses configure SPF and DKIM but forget DMARC.
DMARC helps protect your domain from spoofing and gives better control over failed authentication.
6. Mail Records Proxied in Cloudflare
Mail records should usually be DNS Only.
If records like mail, smtp, imap, or provider CNAMEs are proxied incorrectly, email access may fail.
7. Website Forms Not Using SMTP
If your contact forms send email using unauthenticated PHP mail, messages may go to spam.
Configure SMTP for reliable form delivery.
8. No Email Backup Plan
Business email can contain important customer conversations, invoices, quotations, and documents.
Make sure your email provider has retention, backup, or export options.
9. Weak Passwords
Business email accounts are common targets for attackers.
Use strong passwords and enable two-factor authentication wherever possible.
10. Not Testing After Setup
Always test sending, receiving, spam placement, mobile access, website forms, and authentication records after setup.
Best Practices for Professional Business Email
To keep your business email reliable and secure, follow these best practices.
Use Clear Email Addresses
Use simple and professional addresses.
Good examples:
info@yourcompany.comsales@yourcompany.comsupport@yourcompany.com
Avoid confusing names like:
business12345@gmail.comcompany.helpdesk.official@gmail.com
Use Strong Passwords
Use long and unique passwords for every mailbox.
Avoid using:
- Company name
- Phone number
- Simple words
- Reused passwords
- Common patterns
Use a password manager if possible.
Enable Two-Factor Authentication
Two-factor authentication adds an extra layer of protection.
Even if someone gets the password, they still need the second verification step to access the mailbox.
This is very important for admin accounts, billing accounts, and management emails.
Set Up SPF, DKIM, and DMARC
Do not skip email authentication.
SPF, DKIM, and DMARC help improve email trust and reduce spoofing risk.
Use Professional Email Signatures
A good email signature makes your communication look polished.
Include:
- Name
- Position
- Company name
- Phone number
- Website
- Address if needed
- Social links if relevant
Avoid overly large images or too many colors.
Separate Department Emails
Use department-based emails for organized communication.
For example:
sales@yourcompany.com for sales inquiriessupport@yourcompany.com for support ticketsbilling@yourcompany.com for invoices and payments
This keeps communication cleaner as your business grows.
Monitor Spam and Delivery Issues
If customers say they are not receiving your emails, check:
- Spam placement
- Authentication records
- Blacklist status
- Mail server reputation
- DNS records
- Attachment size
- Email content quality
Email deliverability needs regular monitoring.
Professional Email Examples for Businesses
Here are some useful email address ideas for different business needs.
General Business
info@yourcompany.comhello@yourcompany.comcontact@yourcompany.com
Sales
sales@yourcompany.comquotes@yourcompany.combusiness@yourcompany.com
Support
support@yourcompany.comhelp@yourcompany.comcare@yourcompany.com
Billing
billing@yourcompany.comaccounts@yourcompany.compayments@yourcompany.com
HR
hr@yourcompany.comcareers@yourcompany.comjobs@yourcompany.com
Technical
admin@yourcompany.comnoc@yourcompany.comsecurity@yourcompany.com
For small businesses, start with only the addresses you actually need. Too many unused mailboxes can become difficult to manage.
Business Email Setup Checklist
Use this checklist when setting up professional business email.
Before Setup
- Register or confirm your domain name.
- Choose an email hosting provider.
- Decide required email addresses.
- Get DNS access.
- Note current DNS records.
- Check whether the domain already has email configured.
- Prepare user list and passwords.
During Setup
- Verify domain ownership.
- Create mailboxes.
- Add MX records.
- Add SPF record.
- Add DKIM record.
- Add DMARC record.
- Add provider-specific CNAME or TXT records.
- Keep mail records DNS Only if using Cloudflare.
- Configure webmail or email clients.
- Enable two-factor authentication.
After Setup
- Test sending email.
- Test receiving email.
- Check spam folder.
- Verify SPF, DKIM, and DMARC.
- Configure website SMTP.
- Test contact forms.
- Add email signatures.
- Train users on password safety.
- Monitor delivery for a few days.
How BISUP Helps With Business Email Setup
Setting up business email is not only about creating an email address.
A proper setup includes domain verification, DNS records, mail routing, email authentication, spam protection, SMTP configuration, testing, and ongoing support.
At BISUP, we help businesses set up professional email with their own domain.
Our team can help with:
- Business email setup
- Google Workspace setup
- Microsoft 365 setup
- Zoho Mail setup
- cPanel email setup
- DirectAdmin email setup
- MX record configuration
- SPF setup
- DKIM setup
- DMARC setup
- Cloudflare DNS setup
- Email migration
- Website SMTP setup
- Contact form email fixing
- Spam and delivery issue troubleshooting
- Secure mailbox configuration
Whether you are starting a new business email or moving from an old provider, BISUP can help configure everything properly so your email works reliably.
Frequently Asked Questions
What is a professional business email?
A professional business email is an email address that uses your own domain name, such as info@yourcompany.com, instead of a free email domain like Gmail or Yahoo.
Do I need a domain name for business email?
Yes. To create a domain-based business email, you need a domain name.
Can I use Gmail with my own domain?
Yes. You can use Google Workspace to create Gmail-based business email with your own domain.
Can I use Outlook with my own domain?
Yes. Microsoft 365 allows you to use Outlook and Exchange Online with your own business domain.
What is the best business email provider?
The best provider depends on your needs. Google Workspace is popular for Gmail users, Microsoft 365 is strong for Outlook and Office users, Zoho Mail is budget-friendly, and hosting email can work for basic needs.
What are MX records?
MX records tell the internet which mail server should receive email for your domain.
What is SPF?
SPF is an email authentication record that tells receiving mail servers which systems are allowed to send email for your domain.
What is DKIM?
DKIM adds a digital signature to outgoing emails so receiving servers can verify that the message is legitimate and was not modified.
What is DMARC?
DMARC works with SPF and DKIM. It tells receiving servers what to do when an email fails authentication.
Why are my business emails going to spam?
Emails may go to spam because of missing SPF, DKIM, or DMARC records, poor mail server reputation, blacklist issues, spam-like content, unauthenticated website forms, or incorrect DNS settings.
Should email records be proxied in Cloudflare?
No. Mail-related records should usually be DNS Only. Proxying mail records can cause email issues.
Can I create business email from cPanel?
Yes. Many hosting providers allow you to create domain-based email accounts from cPanel.
Do I need SPF, DKIM, and DMARC?
Yes. For a professional setup, you should configure all three because they improve authentication, deliverability, and domain protection.
Conclusion
A professional business email is a small setup that creates a big difference.
It improves trust, strengthens your brand, gives your business a more professional identity, and helps you communicate with customers more confidently.
But proper business email setup is more than just creating info@yourcompany.com.
You need the right email provider, correct MX records, SPF, DKIM, DMARC, secure mailbox settings, SMTP configuration, and proper testing. If these are not configured correctly, emails may go to spam, fail delivery, or expose your domain to spoofing risks.
For businesses, email is one of the most important communication channels. It should be set up properly from the beginning.
If you need professional business email with your domain, BISUP can help you set up, secure, and manage everything from DNS records to mailbox configuration.
Need Help Setting Up Business Email?
BISUP provides professional business email setup, DNS management, Cloudflare configuration, email migration, and deliverability support.
We can help you create email addresses like:
info@yourcompany.comsales@yourcompany.comsupport@yourcompany.com
and configure them with proper MX, SPF, DKIM, DMARC, and SMTP settings.
Contact BISUP today to set up professional business email for your domain.