
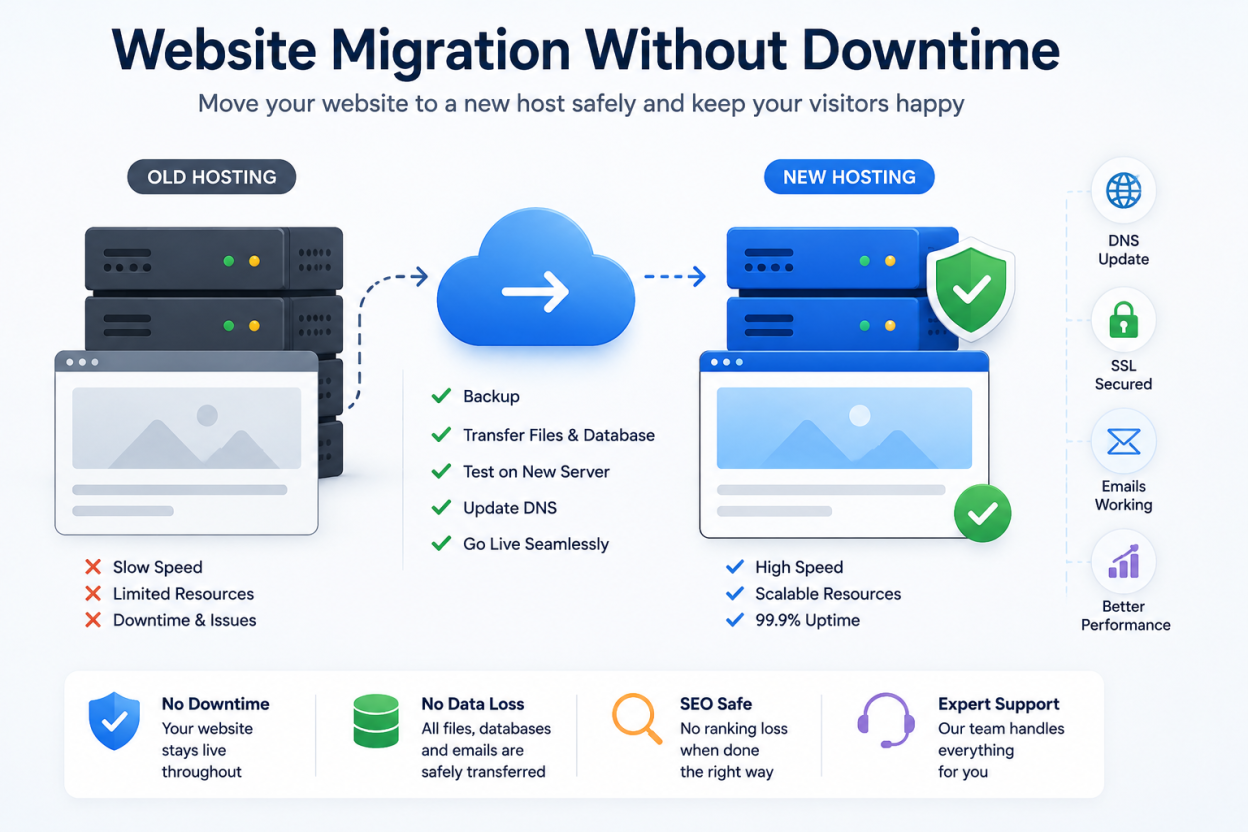
Website migration is the process of moving a website from one hosting environment to another.
Sometimes this means moving from shared hosting to a VPS. Sometimes it means shifting from one cPanel server to another. In other cases, it may involve moving from DirectAdmin to cPanel, from an old VPS to a cloud server, or from one hosting provider to another.
On the surface, migration sounds simple. Download the website from the old server, upload it to the new one, and change DNS.
In real work, it needs more care.
A website usually depends on more than files. It may also depend on a database, PHP version, email records, SSL certificate, cron jobs, plugins, cache settings, environment files, API keys, payment gateways, and contact forms.
If any of these are missed, the website may load halfway, show database errors, break forms, lose email delivery, or show SSL warnings.
That is why proper website migration without downtime is planned step by step. The goal is not only to move the website. The goal is to move it safely without affecting visitors, customers, search engines, or business emails.
Why Businesses Move Websites to a New Host
Most businesses do not migrate websites for fun. They migrate because something is no longer working well.
The current hosting may be slow. The website may go down during traffic spikes. Support may be poor. The server may not support the required PHP version. Email may be unreliable. Or the website may have grown beyond what the old hosting plan can handle.
For example, a small business may start with cheap shared hosting. At the beginning, it works fine. But later, the website gets more traffic, more plugins, more images, and more form submissions. Suddenly, the same hosting starts feeling slow.
An online store may migrate because checkout pages take too long to load.
A Laravel application may migrate because the old host does not support the required PHP extensions or queue workers.
A company website may migrate because downtime is affecting customer trust.
Common reasons for migration include:
- Slow website loading speed
- Frequent downtime
- Poor technical support
- Limited server resources
- Outdated PHP, MySQL, or Node.js versions
- Security concerns
- Malware issues
- Need for VPS or cloud hosting
- Better backup system
- Better performance
- Better pricing
- More control over the server
Migration is a technical task, but the reason behind it is usually business growth. A faster and more stable website can improve leads, sales, trust, and customer experience.
How Website Migration Without Downtime Actually Works
A website can be migrated without downtime when the new server is fully ready before DNS is changed.
Think of it like shifting an office.
You would not close the old office before preparing the new one. First, you arrange the new space. Then you move the furniture, connect the internet, test electricity, set up phones, and make sure staff can work there. Only after that do you tell customers about the new location.
Website migration works the same way.
The old server should continue serving visitors while the new server is being prepared in the background. Once the new server is ready and tested, DNS records are updated so visitors start reaching the new server.
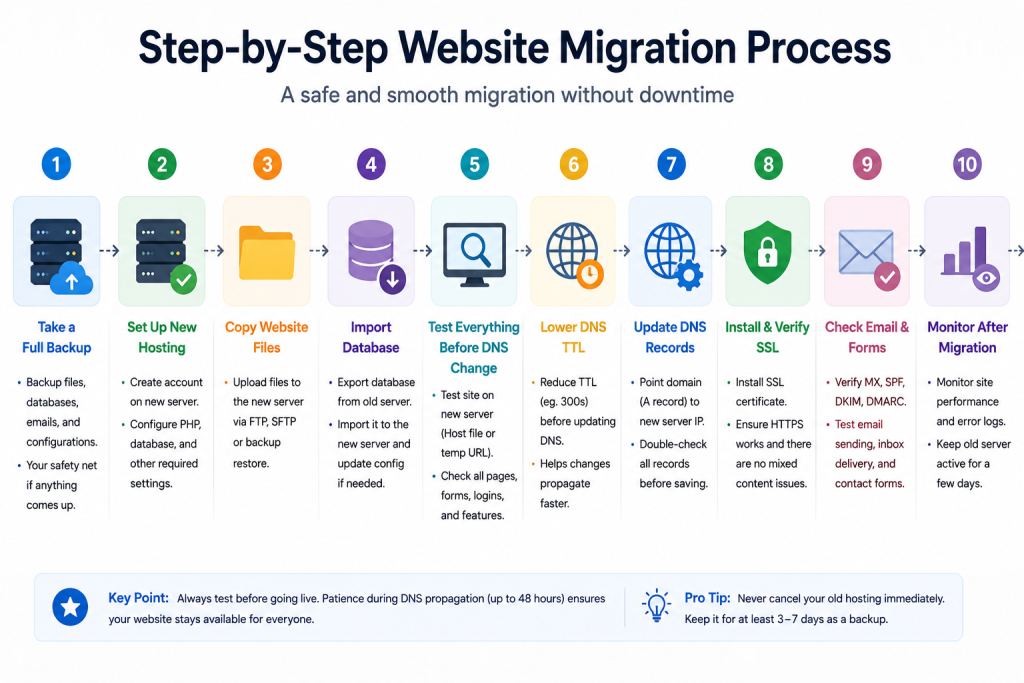
A safe migration usually follows this flow:
- Back up the existing website.
- Set up the new hosting account or server.
- Copy website files.
- Export and import the database.
- Configure the website on the new server.
- Test the website before DNS change.
- Lower DNS TTL if possible.
- Update DNS records.
- Install and verify SSL.
- Test email and forms.
- Monitor the website after migration.
- Keep the old server active for a few days.
The most important rule is this:
Do not point visitors to the new server until the website has been tested properly.
Many migration issues happen because DNS is changed too early. Once DNS points to the new server, real users start visiting it. If the database is missing, SSL is not installed, or files are incomplete, the problem becomes public immediately.
Pre-Migration Checklist
Before touching anything, collect the details. A short checklist can save hours of troubleshooting later.
You should confirm access to:
- Old hosting control panel
- New hosting control panel
- Domain registrar
- Cloudflare or DNS provider
- Website admin dashboard
- FTP, SFTP, or SSH
- Database access
- Email control panel
Next, review the website itself.
Check which platform it uses. Is it WordPress, Laravel, custom PHP, Node.js, or something else? Check the PHP version, database version, required extensions, file permissions, cron jobs, and storage usage.
Also review DNS records carefully. This is especially important when email is connected to Google Workspace, Microsoft 365, Zoho Mail, cPanel email, or another mail provider.
Keep a copy of:
- A records
- CNAME records
- MX records
- TXT records
- SPF records
- DKIM records
- DMARC records
- Subdomains
- Nameservers
DNS mistakes are one of the most common reasons migrations go wrong.
A website may move successfully, but email may stop working because MX records were removed. Or the website may load, but contact forms may fail because SMTP settings still point to the old server.
Good preparation avoids these problems.
Step 1: Take a Full Website Backup
Never start migration without a complete backup.
A proper backup should include website files, database, DNS records, configuration files, email data if email is being migrated, SSL details, cron jobs, and any custom server settings.
For a WordPress website, back up:
- WordPress files
wp-content- Themes
- Plugins
- Uploads
- Database
wp-config.php.htaccess
For a Laravel website, back up:
- Application files
.envfilepublicdirectorystoragedirectory- Database
- Composer files
- Queue and scheduler configuration
For a cPanel website, a full cPanel backup is usually the easiest option. For DirectAdmin, use the full account backup option.
A backup is your safety net. If anything goes wrong, you can restore the website instead of rebuilding from scratch.
Step 2: Prepare the New Hosting Server
The new hosting environment should match the website’s requirements.
This step is more important than many people think. A website that works on one server may break on another if the PHP version, extensions, permissions, or database settings are different.
Check these before uploading the website:
- Web server: Apache, Nginx, LiteSpeed, or OpenLiteSpeed
- PHP version
- Required PHP extensions
- MySQL or MariaDB version
- Node.js version if required
- Composer if required
- Database user and password
- File permissions
- Cron jobs
- SSL support
- Mail service if email is also hosted there
For WordPress, make sure the PHP version and extensions are compatible with the theme and plugins.
For Laravel, check the .env file, storage permissions, queue workers, scheduler cron, and web root. Laravel should point to the public directory, not the project root.
For Node.js applications, check the Node.js version, npm packages, environment variables, application port, PM2 process, and reverse proxy configuration.
The goal is to make the new server ready before it receives live traffic.
Step 3: Copy Website Files and Database
Once the new hosting is ready, move the website data.
Website files can be copied using FTP, SFTP, SSH, rsync, Git deployment, cPanel backup restore, DirectAdmin backup restore, or a migration plugin.
The database can be exported from the old server and imported into the new one using phpMyAdmin, Adminer, MySQL command line, or control panel tools.
After importing the database, update the website configuration.
For WordPress, check wp-config.php.
For Laravel, check .env.
For custom PHP websites, check the database connection file.
Make sure the database name, username, password, and host are correct. A small mistake here can cause a database connection error even when the files are copied correctly.
Also check file ownership and permissions. Wrong permissions can break uploads, cache, sessions, or plugin updates.
Step 4: Test the Website Before Changing DNS
This is the step that separates a clean migration from a risky one.
Before updating DNS, test the website on the new server privately. Do not wait for visitors to find problems.
You can test using:
- Temporary URL
- Staging domain
- Preview URL
- Server IP, if supported
- Local hosts file method
- Temporary subdomain
The hosts file method is especially useful. It lets your own computer load the domain from the new server while everyone else still sees the old website.
Test important pages and functions:
- Homepage
- Internal pages
- Images
- CSS and JavaScript
- Contact forms
- Admin login
- User login
- Search
- Checkout
- Payment gateway
- File uploads
- Email notifications
- API connections
- Database-driven pages
- Mobile layout
For WordPress, also test permalinks, media files, plugins, forms, and WooCommerce checkout if used.
For Laravel, test login, routes, sessions, storage links, queues, scheduled tasks, and payment callbacks.
A homepage loading correctly does not mean the full website is working. Test the parts that matter to the business.
[IMAGE PLACEHOLDER]
Image description: Step-by-step migration flow showing Backup → New Server → Test → DNS Update → SSL → Monitor.
Alt text: Step by step website migration process without downtime
Step 5: Lower DNS TTL Before Migration
TTL means Time To Live. It controls how long DNS resolvers remember old DNS information.
If TTL is high, some users may continue reaching the old server for a longer time after DNS is changed.
Before migration, reduce TTL if your DNS provider allows it. Many teams use 300 seconds during migration planning.
Lowering TTL does not make DNS instant everywhere, but it helps make the switch faster and smoother.
If your domain uses Cloudflare, DNS changes are usually easier to manage from one dashboard. Still, records must be checked carefully before saving changes.
Step 6: Update DNS Records
After the new server is tested, update DNS.
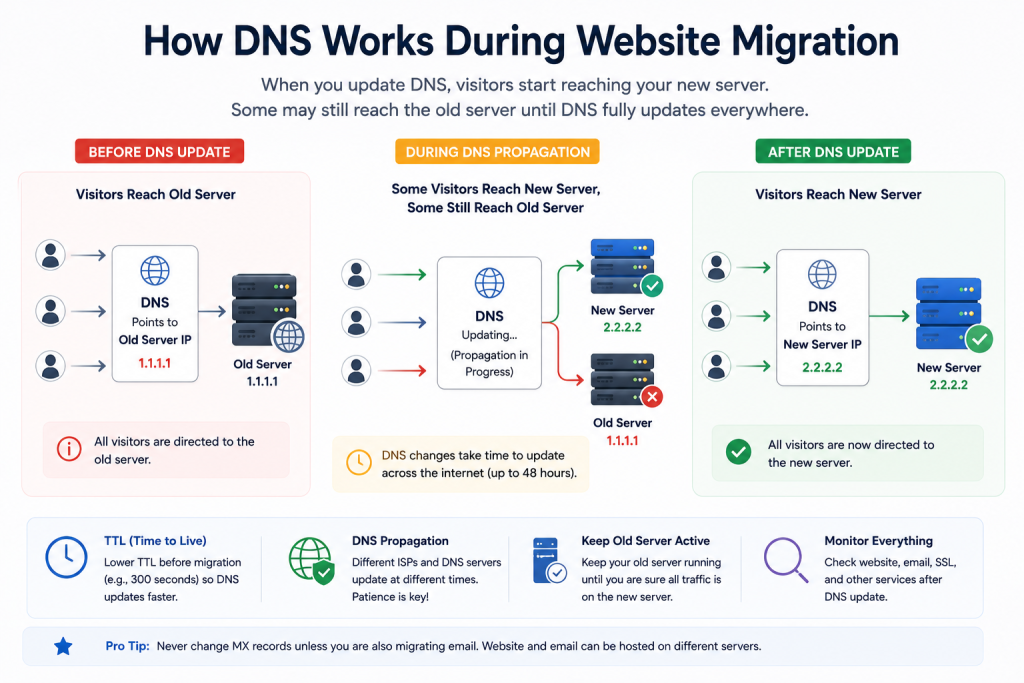
In most website migrations, this means changing the A record to the new server IP address.
For example:
yourdomain.com → new server IP
Also check records for:
www- Subdomains
- API subdomains
- Application subdomains
- Staging or admin subdomains
If you use Cloudflare, update these records inside the Cloudflare DNS dashboard.
Be careful with email records.
Do not change MX records unless you are also migrating email. Website hosting and email hosting are separate things. A domain can load its website from one server and receive email through another provider.
Before saving DNS changes, compare old DNS records with the new setup. Make sure no important MX, SPF, DKIM, or DMARC records are missing.
[IMAGE PLACEHOLDER]
Image description: DNS migration diagram showing visitors, Cloudflare DNS, old server, and new hosting server.
Alt text: DNS update during website migration to new host
Step 7: Install and Verify SSL
After DNS starts pointing to the new server, check SSL immediately.
Your website should load with HTTPS:
If SSL is missing or misconfigured, visitors may see a browser warning. That can damage trust, especially on business and eCommerce websites.
SSL may be installed using Let’s Encrypt, cPanel AutoSSL, DirectAdmin SSL, Cloudflare SSL, a paid SSL certificate, or an origin certificate.
Check:
- HTTPS loads correctly
- No browser warning appears
- HTTP redirects to HTTPS
wwwand non-wwwversions work- No mixed content warning appears
- SSL certificate is valid on the new server
If the website uses Cloudflare, select the correct SSL mode. For most business websites with a valid SSL certificate on the origin server, Full Strict is usually the better setup.
Avoid leaving a production website on Flexible SSL if the origin server supports HTTPS.
Step 8: Check Email During Migration
Email often breaks during website migration because people forget that DNS controls both website and mail routing.
Before migration, confirm where email is hosted.
It may be hosted on:
- The old hosting server
- Google Workspace
- Microsoft 365
- Zoho Mail
- cPanel email
- DirectAdmin email
- A separate mail server
If email is hosted separately, keep existing MX records unchanged.
If email is being migrated too, create mailboxes on the new server before changing MX records. Back up old emails, test webmail, confirm passwords, and then update mail routing.
Also test contact forms after migration. Many websites send form emails through SMTP. If SMTP still points to the old server or uses old credentials, form delivery may fail.
Check these records after migration:
- MX
- SPF
- DKIM
- DMARC
- SMTP settings
- Webmail access
- Contact form delivery
Website migration without downtime should not only keep pages online. It should also keep business communication working.
Step 9: Monitor the Website After Migration
After DNS is updated, monitor the website closely.
Do not assume the work is finished because the homepage opens.
Check error logs, SSL, forms, email delivery, database connection, CPU usage, RAM usage, disk usage, broken links, redirects, and website speed.
For business websites, monitor the website for at least 24 to 72 hours.
Also keep the old hosting active for a few days. Some visitors may still reach the old server during DNS propagation. Keeping the old server online reduces the chance of downtime and gives you a rollback option.
For high-traffic websites or eCommerce stores, keep the old server active longer.
Common Website Migration Mistakes
Most migration problems are avoidable.
The biggest mistake is changing DNS before the new server is ready. Once that happens, visitors reach an unfinished setup.
Another common mistake is taking only a file backup and forgetting the database. The website files may load, but dynamic content will fail.
Wrong PHP versions also cause issues. A website built for one PHP version may break on another. This is common with older WordPress plugins or Laravel projects.
Missing configuration files are another serious issue. Files like .env, wp-config.php, and .htaccess may be small, but they control how the website connects to the database, handles routes, and loads securely.
Email mistakes are also common. Changing nameservers without copying MX and TXT records can stop email delivery.
Other common mistakes include:
- No full backup
- Missing database import
- Wrong file permissions
- SSL not installed
- Cache not cleared
- Contact forms not tested
- Old server deleted too early
- DNS records overwritten
- Cron jobs forgotten
- Payment callbacks not tested
A careful checklist prevents most of these problems.
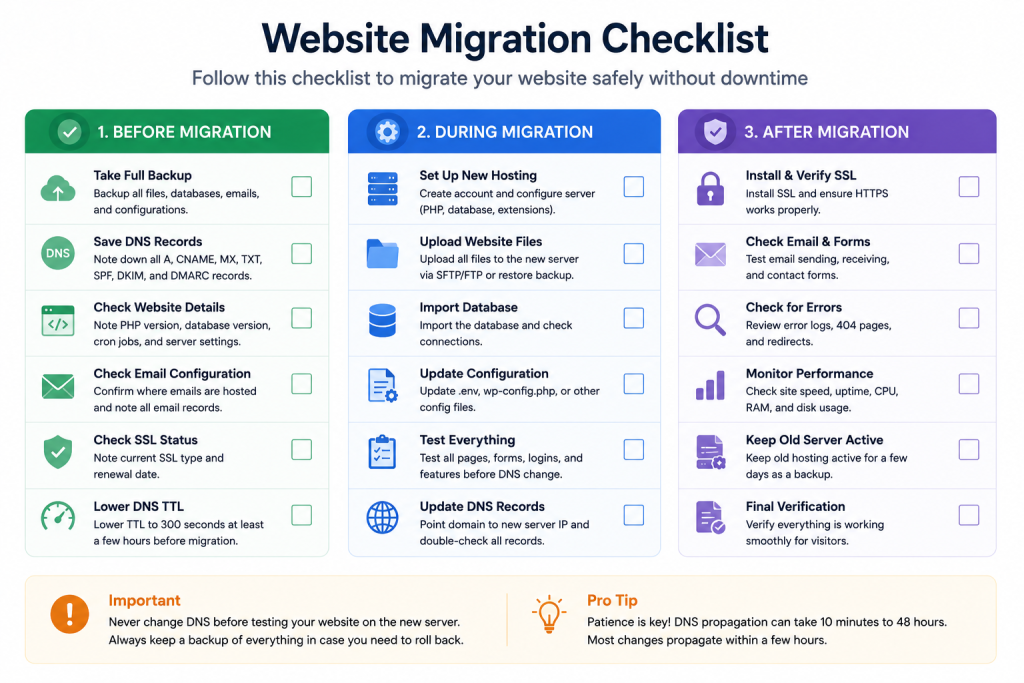
Website Migration Without Downtime Checklist
Use this checklist during migration.
Before Migration
- Take a full website backup
- Export the database
- Save current DNS records
- Check PHP version
- Check database version
- Check email provider
- Check SSL status
- Check cron jobs
- Check website size
- Lower DNS TTL if possible
During Migration
- Set up the new server
- Upload website files
- Import the database
- Update configuration files
- Set correct file permissions
- Install required PHP extensions
- Configure cron jobs
- Install SSL
- Test the website before DNS update
- Update DNS only after testing
After Migration
- Test homepage and internal pages
- Test admin login
- Test contact forms
- Test checkout if available
- Test email sending and receiving
- Check SSL certificate
- Check redirects
- Review error logs
- Monitor server resources
- Keep old hosting active temporarily
[IMAGE PLACEHOLDER]
Image description: Checklist-style image showing backup, database, DNS, SSL, email, and testing.
Alt text: Website migration checklist for hosting transfer
Does Website Migration Affect SEO?
Website migration can affect SEO if it is handled badly.
If you are only changing the hosting server and keeping the same domain and URL structure, the SEO risk is usually low. Search engines will still find the same pages at the same URLs.
Problems happen when URLs change, redirects are missing, SSL breaks, pages return 404 errors, or the new server becomes slower than the old one.
After migration, check:
- Sitemap
- Robots.txt
- Canonical tags
- 404 errors
- Redirects
- HTTPS status
- Page speed
- Google Search Console
- Important landing pages
Try to keep the same URL structure unless there is a good reason to change it.
If the domain name or URL structure changes, plan redirects properly before migration.
Website Migration for WordPress
WordPress migration is common, but it still needs proper testing.
A WordPress website usually includes files, plugins, themes, uploads, and a database. The database stores pages, posts, settings, menus, plugin data, and user information.
After migration, check:
- Permalinks
- Media library
- Plugin compatibility
- Theme layout
- Admin login
- Contact forms
- Cache plugin settings
- SEO plugin settings
- WooCommerce checkout if used
If the domain stays the same, the process is easier.
If the domain changes, update old URLs in the database carefully. Do not blindly replace values without a backup.
Website Migration for Laravel
Laravel migration needs extra attention because the application depends on environment settings, permissions, and server configuration.
Check:
- PHP version
- Composer dependencies
.envfile- Database connection
- Storage permissions
- Queue workers
- Scheduler cron
- Public directory as web root
- Cache configuration
- SSL and reverse proxy settings
After moving a Laravel project, common commands include:
composer install --no-dev --optimize-autoloader
php artisan config:clear
php artisan cache:clear
php artisan route:clear
php artisan view:clear
php artisan storage:link
Also test login, sessions, file uploads, queues, scheduled tasks, and API endpoints.
A Laravel website can look fine at first but fail later if cron jobs or queues are not configured.
Website Migration with Cloudflare
Cloudflare can make migration easier because DNS records are managed from one dashboard.
It can help with quick DNS updates, SSL settings, caching, and traffic filtering. But Cloudflare can also create confusion if records are not configured correctly.
During migration, check:
- A record points to the new server
wwwrecord is correct- SSL mode is correct
- Cache is cleared after migration
- Mail records are DNS Only
- No redirect rule points to the old setup
- Firewall rules are not blocking traffic
After switching servers, purge Cloudflare cache if visitors still see old content.
Also check proxy status. Website records can usually be proxied. Mail-related records should usually remain DNS Only.
FAQ
How long does website migration take?
A simple website may take a few hours. Larger websites, WordPress stores, Laravel applications, email accounts, and database-heavy websites can take longer. The total time depends on website size, access, testing, DNS, and email setup.
Can website migration be done without downtime?
Yes. Website migration without downtime is possible when the new server is prepared and tested before DNS is updated. The old hosting should also stay active during DNS propagation.
Will migration affect SEO?
Migration may affect SEO if URLs change, redirects are missing, SSL breaks, or pages return errors. If the same domain and URL structure are kept, and the migration is tested properly, SEO impact is usually minimal.
Do emails move during website migration?
Not always. Website hosting and email hosting are separate. If email is hosted with Google Workspace, Microsoft 365, or Zoho Mail, only website hosting may move. If email is hosted on the old server, email migration must be handled separately.
Should I keep the old hosting active after migration?
Yes. Keep the old hosting active for at least a few days. This helps avoid downtime during DNS propagation and gives you a rollback option.
What is DNS propagation?
DNS propagation is the time it takes for DNS changes to update across different networks and DNS resolvers. Some visitors may reach the new server quickly, while others may still reach the old server for some time.
Can BISUP migrate WordPress websites?
Yes. BISUP can migrate WordPress websites, including files, databases, themes, plugins, SSL, DNS, email records, and final testing.
Can BISUP migrate cPanel or DirectAdmin websites?
Yes. BISUP can help migrate websites between cPanel, DirectAdmin, VPS, cloud servers, and managed hosting environments.
Summary
Website migration is not only a file transfer. It is a careful process that includes backups, database transfer, DNS planning, SSL setup, email checks, and testing.
The safest way to achieve website migration without downtime is to prepare the new server first. The website should be copied, configured, and tested before DNS is changed.
Email records should be handled carefully. Many website migrations succeed technically but break email because MX, SPF, DKIM, or DMARC records were missed.
The old hosting should not be deleted immediately. Keeping it active during DNS propagation helps avoid downtime and provides a rollback option.
When done properly, migration can improve website speed, security, uptime, and long-term reliability.
Need Help Migrating Your Website?
BISUP helps businesses move websites safely from old hosting to faster and more reliable servers.
Whether you are moving a WordPress website, Laravel application, cPanel account, DirectAdmin account, VPS, or cloud server, BISUP can handle the technical work from start to finish.
Our team can help with website files, databases, DNS records, Cloudflare setup, SSL installation, email records, contact forms, and post-migration testing.
If you want to migrate your website without downtime, data loss, SSL errors, or email problems, contact BISUP for professional website migration support.
